Advanced 3D Printing for Cool Kids – ‘What makes it tick’-edition
So you want to be able to 3D print like the best of them? Want to get your printing skill to 99? Want to be able to explain the difference between SLS and FDM printing to the average Joe to definitively prove your absolute intellectual superiority? Well then, let’s go ahead and make a 3D printing guru out of you!
First, I want to explain a few different types of 3D printing processes. Not that you’ll need to use them all (it really epends on your goals) but it kind of illustrates the difference in technologies nicely, helping you appreciate the strengths of each in context to the others.
If you’re looking for troubleshooting advice, skip ahead to any relevant chapter for tips & tricks.
FDM vs SLA vs SLS vs MJF
If these seem like random letters to you then don’t worry: they’re not and they all stand for pretty self-explanatory terms (if you’re a little bit in the know). In essence they all indicate different additive printing processes (additive vs subtractive processing: adding material or taking it away, like CNCing).
FDM – Fused Deposition Modelling
FDM – Fused Deposition Modelling = a process that deposits a material such as industry standard PLA to build (or fuse) together into a gradually built up model. These are usually your super standard desktop filament printers, like the Creality CR-10, Prusa i3 Mk3s or Ultimaker S3. Results are limited to shapes that can be printing in mid-air or with supports and have the least impressive finish but biggest impact from print settings. Sometimes also referred to as FF (Fused Filament) printers.
FDM printers are the most common, for good reason: they are very easy to operate, modify and maintian. The solid material stock means little maintenance, few health risks (while using bio-degradable PLA) and relatively predictable print results. Decent hobby-grade FDM printers can be bought for as little as €100 nowadays and filament is comapratively dirt cheap.
Given a somewhat forgiving model and a strong frame and drive system, even these cheap printers can achieve amazing print results. However, with FDM, it’s all about the print settings. Your tweaking of speeds, temps and other fine behaviourisms can turn even the cheapest of printers into impressive little reliable factories.

SLA – Stereolithography
SLA – Stereolithography = a less mechanically reliant printing method that uses liquid resins that harden with exposure to UV to build up a model one layer at a time. The print ‘bed’ in this case is inverted to be upside down and lowered into a ‘vat’ of this resin. A transparent floor allows a laser or LCD filtered UV lamp to expose the resin and harden it as a for of lithography. Post-processing is needed to wash of excess resin and to further fully harden the resin into its final state with UV light (and heating).
While resin printing has been quite affordable for the consumer for a few years now, reliability has been more of an issue than FDM counterparts. Bed adhesion is all the more crucial in resin printing, as a detached first layer means a potentially completely polluted vat with partially hardened blobs. Damage to the delicate transparant floor of these vats and safety concerns over the resin also limit its use somewhat.
However, when one gets the hang of it, SLA printing produces the most visually perfect parts of any of these technologies, owing to its liquid based process. Popular SLA printers are Creality or Elegoo budget printers or Formlabs’ Form 3 or 3L starting from as little as €500.
SLS – Selective Laser Sintering
SLS – Selective Laser Sintering = a powder-based printing method where a bed is gradually filled with new layers of powder (usually a form of Nylon). Each layer is selectively fused by a laser and lowered layer by layer until a ‘cake’ the size of a full bed is created. This ‘cake’ consists of loose powder within which the sintered object of solid material exists. Post-processing is needed to fully remove the solid object from this block of powder.
Printing with SLS has been a very pricey proposition, especially for the hobbyist until recently. In the past few years a few brands have started shipping printers in a slightly more accessible 5k-20k range, but the need for handling expensive (and explosive) fine plastic powders and concerns + equipment involved mean it’s still firmly positioned in the domain of commercial and industrial use.
SLS’s strength is that its printed objects usually have great strength-, wear- and thermal properties and can in some cases easily be used as end-use parts in limited production runs. Popular low(er)-cost SLS printers are the Sinterit Lisa and new Formlabs Fuse 1. Although production in industrial quantities usually happens on maintenance heavy machines more in the €100k ballpark.
There are other processes like MJF, which that combines traditional inkjet printing technology with power printing processes. But these are often in infancy, highly specialized industrial scale or experimental.
Consumer Desktop 3D Printing
On the consumer side, only FDM and SLA printers are really attainable for consumers and hobbyists, with the mainstay really still being FDM owing to its dirt cheap filaments and high degree of versatility. These printers are cheap and can be very reliable and produce very fine parts if you tune and treat them well. It’s the type I’ll focus on most as the most used and most adjustable one.

Really perfectly tuning your FDM printer is, however, usually a combination of troubleshooting potential hardware deviations and figuring out what settings work best with your printer for what types of models. Every invididual printer and every model are unique so knowing and anticipating how these two will react to one another is the tricky trick!
You have to get a feel for this through experimentation and requires a bit of insight into how these printers work, so allow me to try to get you started quick by sharing some of what I know…
Hardware: The bits that go brrrr

An FDM printer is really a very simple thing: it has a heated print head with a few axes for that head to move on, an extruder mechanism that pushes filament into that print head, some stepper motors to make those axes and that extruder move, a bed to print on and a controller board + power supply to translate the lines of code in your print file to physical movements.
Nowadays, you can basically order the electronics, frame and ‘printer-y bits’ from chinese webstores like AliExpress or Banggood and design your own printer from scratch with only some tweaking to standard firmware needed to get your printer running.
The Axes
Most FDM printers you’ll see are what we call ‘cartesian’: they function on a very straightforward xyz axis system. This means one axis (or belt/rod combination, mechnically speaking) for backwards/forwards, one for sideways, one for up and down. These axes are driven by belts (x-axis, y-axis) and/or spindles (z-axis i.e: up/down). Belts are directly driven by stepper motors, which means they can make pretty good speed, but lack super fine positional control. Fine for regular XY control, but the Z axis is usually run by a spindle as it needs a little more resolution for that really fine layer height control.

This type of movement system is simple to build, simple to drive and above all: simple to troubleshoot. If your part displays surface imperfections your axes might be misaligned, your belts might have too much slack or your Z axis spindle might be a little bent. This simplicity means you may be able to extrapolate problems and try to see how the functioning of those axes might be causing it. A hardware deviation is usually signalled by some pretty obvious repeating imperfections in the model.
There exist other systems too, like delta printers and infinite Z (or belt) printers:
- Delta printers take a 3 axis approach too, but in a very different way where a carefully choreographed combination of three vertical ‘Z’ axes determines both height and XY position of the print head. These printers often have a smaller footprint and have some particular use in shell-type and large scale prints, but are more expensive, harder to troubleshoot and harder to modify/tweak.
- ‘Infinite Z’ or belt-style cartesian printers (as I like to call them) are a relatively new idea where you tilt your XY plane 45deg. and print on a constantly running belt that funtions as bed, essentially also replacing your Z axis. This allows theoretically infinite printing as any model that is done eventually rolls off the end of the belt and pops off, leaving the printer to continue on the next stretch of free belt with its next print. It also allows very long objects to be printed.
The Motors
Now, for the spinny bits: the motors! Nearly all printers (especially consumer grade) will use stepper motors to spins these axes. If you aren’t familiar: a stepper motor is made up of a magnetic core with a set of carefully spaced electromagnets around it, using carefully timed alternating activation of these magnets to very accurately rotate the core and attached axis by set amounts.
Basically, each time the motor turns on the next electromagnet in the series, the magnetic core jumps forwards one position. The fact that this activated magnet then holds the core in that position is also quite useful for printers, preventing your axis from drifting too easily upon contact with external forces (think of the print head lightly dragging over your part while printing).
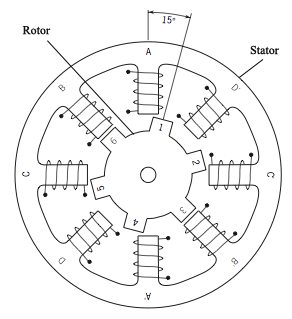
Stepper motors are a little trickier to drive than regular DC motors however; because they use a complex set of offset internal magnets, the controlling electronics need to send a variety of input signals to turn these on at the right intervals. Especially when moving through the steps quickly (constant rotation) the timing is very important to make the rotor move smoothly.
That’s why these motors are always ‘driven’ by an accompanying motor driver chip, that accepts very simple movement commands from the main controller and translates these into the more direct variety of signals needed to make the motor actually move. It also features much beefier electronics inside to accomodate the higher currents needed by all those electromagnets in said motor. Sometimes these ships are directly soldered to the main board, sometimes they feature as replacable modules.
Nowadays, many motor driver chips feature advanced smoothing or reporting features, making the motors quieter while moving or less prone to skipping steps. Some can even communicate back to the main controller to let it know about skipped steps it detects through subtle changes in electrical resistance on the motor’s side.
Usually, your printer will have four or five motors:
- 1 X axis motor
- 1 Y axis motor
- 1 or 2 Z axis motor(s)
- 1 extruder motor
The extruder motor we will touch on in the next part, as it is an integral part of the print head.
The Electronics
Simply put, the ‘brain’ of your printer is a pretty straightforward microcontroller that reads sets of instructions from the sliced print file and translates it into low-level level instructions for the four/five motor controllers. You can usually find this controller at the center of a main conrol board that includes all the little circuitry and component magic needed to keep things safe, stable and reliable when the different parts are communicating and drawing power.
It, and everything else on the machine draws power from the on-board power supply that converts 220V AC mains voltage to a more usable 12V Direct Current. This power supply is used to:
- Heat the bed
- Heat the print head
- Drive the motors
- Power the display
- Power the control board
A failing power supply can start to deliver less power than designed, which can eventually lead to ‘brown-outs’ where the printer randomly resets, stops or skips steps. More often it might cause high-power draw actions to take longer and longer. A print bed, for instance, is a part that draws a significant amount of power from the power supply while its heating up a large radiant surface that is constantly shedding the heat its trying to replenish.
The ‘printy bits’
Now, for the most important parts to know about when troubleshooting: the ones that facilitate the extrusion and deposition of filament into a functional 3D model.

Let’s start with the ‘carriage’. This is the structure that moves along the x-axis, has the nozzle mounted to it and moves relative to the print bed. You can divide the functionality of the parts directly connected to this carriage into the ‘hotend’ and the ‘coldend’.
The hotend includes the heat block, heating element, thermistor and attached nozzle. The coldend describes the heat brake, heat sink and mounting point to the carriage. The extruder mechanism includes the extruder motor, extrusion gear and tension gear/clamp.
A lot of heat gets generated on a constant basis in the hotend. The entire purpose of the coldend is therefore to insulate these hot components from the rest of the assembly as much as possible and shed any excess heat that does make it past the heat brake. The teflon liner further insulates the filament from excess heat higher in the heat break to avoid it softening too early.
Note
The above graphic is roughly modelled on common popular extruder setups, but these come in all sorts of combinations and variations. Dual head extruders exist, but also single head with two or three extrusion mechanisms, both for the purpose of multi-material or -colour printing.
The assembly in the picture above shows a setup known as a ‘direct drive’ extruder, with the extruder mounted almost directly onto the printhead. Another option is a bowden style extruder where the extruder assembly is disconnected from the hot- and coldends by a long tube. The upside is that this makes the print head a lot lighter when it doesn’t need to lug around a heavy stepper motor, the downside is that the much greater distance between extruder and print head introduces a lot of play in the filament that is pushed into the head, making accurate retraction print bed.
Settings
-
Print Temperatures
-
Print Speeds
-
Bed adhesion
-
Retraction
Common Issues
-
Poor bed adhesion
-
Poor extrusion
-
Print finish (stringing, inconsistent layers)
-
Exporting from Blender